
Lithium Swap 6 - Pack it Up!
Once the car itself was cleaned up, it was time to address the other dreaded task I had before me, to rebuild the 30+ cell jumper straps that were needed to build the individual PiFePO4 cells into a complete battery. Like the cell posts, they had been subjected to dirt and corrosion, some heating from current flow, a little bit of arcing along the way and most all of them had been physically distorted or bent due to a number of factors such as improper fasteners, impact of objects, and even deliberate careless bending by someone trying to make them into something they were't intended to be.
I used a variety of methods to correct the problems, sometimes tinking away with a ball-pein hammer, others using a cylinder of steel to roll them flat on the anvil end of my bench vice, while others were sandwiched between had maple wood blocks in the vice to flatten them. There were wire edges, possibly from when the holes were punched in them during manufacturing, these were mostly filed off, or shaved off with an over-sized handheld twist drill. I tried to keep filing them to a minimum so that they wouldn't be losing material on the contact ends.
Finally, when I had gotten them pretty flat and straight, I ran over them with an orbital sander and green Scotchbrite abrasive pads (pot scrubber material). In the end, I had nice, flat and shiny surfaces to mate with the cell terminals.
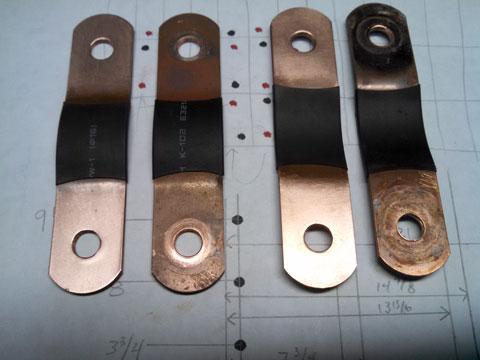
This before-and-after image shows the tops of the straps (left) and bottoms (right).
There were enough straps to join the cells in the six modules that I'd be moving to the car, but I needed straps to join the modules together. In the conversion truck that I bought, the modules were located apart in various places, under the hood, below the bed, etc. and the installer had just used heavy cables with terminal ends. This wasn't going to work for me, as there really wasn't enough space between the terminals to get anything that large in place.
What I decided was that I would fabricate additional custom-length straps similar to those between the cells. Those cell straps were four layers, or "leaves" of .025" copper strap. What I had on hand was a coil of .020" copper strap, so I decided to make my straps five leaves so that they would have the same cross-sectional area as the other straps.
I knew that cutting 35 leaves for the seven straps by hand with tin snips wan't going to "cut it". For one thing, I'd be miserable with arthritis afterwards and the snips would cause the material to curl while I needed things to stay as flat as possible. I do have a handheld pneumatic shear, but even that is difficult enough to get a straight line using that I was not optimistic about the results.
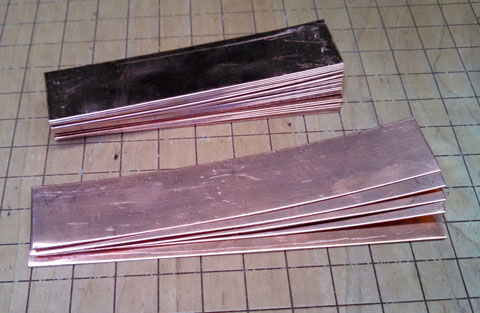
What I ended up doing was using the shears to "rough out" leaves, within about 1/16th or so of what I wanted as a finished dimension, then I set up my office paper shear with some clamped-on fences. Each leaf "blank" was individually sheared for width and length twice.

In the end, the completed leaves were nearly identical, and of uniform width and length.
After that, it a still necessary to drill the holes for the cell terminal bolt. I set up some templates of maple and sandwiched the five leaves of each strap before drilling one hole in the end with the drill press. This ensured a clean hole with no danger of tearing or twisting the soft copper leaves. Once that hole was cleaned up, I inserted a snug-fitting bolt and drew the leaves tight together before clamping and drilling the second hole. This made the finished strap leaves absolutely identical, with holes that lined up perfectly.
With all of the materials fabricated and prepared, it sounds like it would be simple to bolt it all together, but being meticulous has both it's advantages and disadvantages. It took many hours sitting on the garage floor to complete the strapping of the cells.

Before installing the straps, a thin layer of NO-OX-ID anti-corrosion paste was applied to the terminal and attachment hardware. In addition, I put anti-seize compound on the treads of the stainless steel bolts, Locktite copper paste on the negative terminal bolt, and Permatex silver on the positive. All of the fasteners were snugged up, allowed to relax for a time, and then set with a torque wrench.
I had to work very deliberately, not only to be sure that I didn't connect things up wrong, but also because one false movement could cause a short circuit that might result in a fire, explosion, or damage to the cell terminals or straps. All of my tools were covered with foam pipe insulation and black electrical tape to make sure that something as simple as a dropped wrench wouldn't cause a giant disaster.
Slowly, the pack began to take shape, with each cell connected to it's neighbor and the MiniBMS modules installed. The wiring loop between the BMS modules was renovated with all of the quick-disconnect flag terminals recrimped and white heat shrink tubing applied to minimize the possibility of short circuits. As more cells were added, I did another balancing charge to make sure all of the cells were full.
Finally, it was time to install the completed pack into the car. I had been working on getting the front attachments for the hold-down system installed and cleaning the battery compartment floor and walls.
One of the main interests I had was not causing myself to have ruinous back injuries while hoisting around heavy battery modules. So far, I had been doing pretty well, so I took a few minutes to take the front seat out of the car and build a ramp up to the driver's side of the car. The height was calculated to be exactly the same as a plywood platform that I installed in place of the seat. This made transporting and placing the cell modules in the car almost painless. I needed only to stand in the car and lift the modules over the edge of the battery compartment and into place, no lifting then twisting necessary.

After all six cell modules were in the car, there were some adjustments necessary. All of my measuring and calculating was correct, but I hadn't considered that the floor of the battery compartment wasn't as flat as I thought. The lead-acid batteries didn't care, they were just kind of tumbled in there together, but I wanted the lithium modules to nest closely and ride as a unit. Took a few hours to rip out some hardwood shim stock and pad the low spots so that everything fit together square and plumb.

It was probably a couple day's more work to finish the hold down system and put on the custom module connecting straps that I made. The yellow ratchet straps were an ebay purchase, and what a great deal they were! No flimsy Halbol Fleight stuff here, these straps are miniature versions of the tough straps that truckers use to secure loads. I cut off the hooks and had some custom sewing done to provide anchor plates to bolt through the floor and into a 3" steel beam under the car. These batteries aren't going anywhere without the car following!
Since the BMS circuit boards stick up above the cell terminals, I fabricated three stand-off plates out of ¼ ABS sheet plastic, one on each side and one in the middle between the modules. The plates have a bend in them, which I created by heating with a cast-off heating element out of a freezer defroster. The purpose of these is to prevent the fiberglass cover that slides in from the rear hatch from contacting anything delicate while it's being removed or installed.
With the cell modules installed, there is still ample room in the battery compartment for the BMS head unit, an AC contactor and the PFC20 battery charger.
Original material ©1996-2025 Mr. Sharkey | All rights reserved