
Lithium Swap 3 - Rebuilding the BMS
After balancing the cells, it was obvious that whatever path the project took, I needed to have complete confidence in the ability of the battery management system to protect the cells from over charging and over discharging. This meant testing, repairing, and indexing all of the BMS modules, of which there were 45 total (the previous owner supplied seven defective modules in addition to those mounted on the cells).
The first step was to clean them thoroughly. I considered several methods, but ended up settling on a splash of Simple Green detergent, followed by a scrubbing with my old Sonicare electronic toothbrush (which I had replaced because I couldn't find new brush heads for it anymore). After sudsing them up completely, I hosed them off with high pressure water, blew the excess off with compressed air, and put the now-clean modules on top of a warm-but-not-hot wood stove to dry out. I figured that the modules had survived worse conditions over the years, so a little moisture and heat wasn't going to make them any worse.
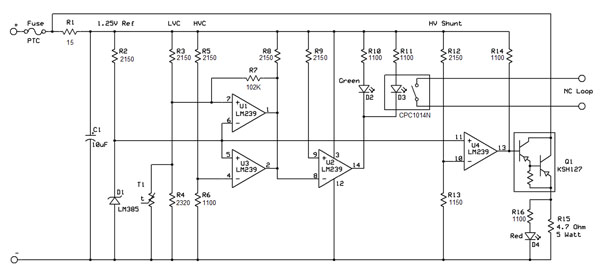
Once the grunge was removed, inspection revealed that almost all of the modules had evidence of "creepage", that is because the module had voltage potential for the traction pack, which was high voltage, and the control loop voltage, which was low voltage, and had a ground reference, the water and dirt had combined to allow small currents to flow between the components of the modules, in effect, etching them via electroplating. In some cases, this resulted in failure of the circuit board traces which would require repair. If the modules had been designed with more care in separating the various voltages, the problem might not have been as bad, and if the modules hadn't been exposed to moisture and contaminants, it might never have been a problem at all.
Each module was given a number, which was engraved on the bottom side of the board. I then created a spreadsheet with columns noting the module number, test condition, low voltage disconnect, high voltage disconnect, bypass voltage, and bypass current.
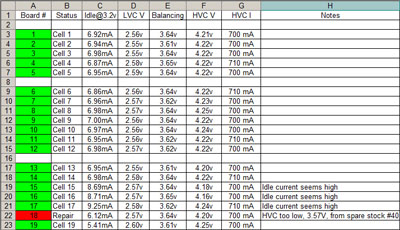
Since I would be testing quite a number of modules, and I wanted to eliminate as many variables as possible, I built a test jig that the modules could be attached to which provided me with the readings I would need to ascertain their condition. Good modules would be grouped together for reuse, while defective modules would have the failure noted and be indexed for repair.
Failures in the modules came in several types. As I mentioned, many of the had circuit board damage, some to the extent that I had to solder jumper wires on the printed circuit boards to carry signals around defective traces. Other boards wold appear to work normally, but they would "latch up", that is once they turned on, they wouldn't sense and turn off the control loop when the cell voltage was too high (a dangerous failure mode). The ones that didn't work at all were obvious right from the start. Several boards had defective optical relays, perhaps damaged by the voltage creep.
After ordering replacement optical relays (a type of opto-isolator), I continued to analyze and repair the remaining defective modules, and used a Dremel tool to cut away excess circuit board traces that were too close together, adding to the voltage creep problems. Repaired boards were retested, the results recorded in the spreadsheet, and put in the growing pile of checked-out boards.
Because a lot of the problems with the BMS modules were caused by moisture, dirt, and creepage, I decided that the repaired boards needed to have a conformal coating applied to increase the isolation between the various parts of the circuitry. After some research, I chose a fairly basic arcrylic coating that would protect the boards but still allow "rework", that is repair and soldering, if any might be needed in the future. Some of the more industrial coatings require extraordinary measures to remove once they are applied. I didn't need that much protection. The stuff wasn't terribly expensive, $12 for 55mL, but it wasn't cheap, either.
In the end, each board was restored as much as possible to the original condition or better, and the terminals tightened and straightened after being polished up.
The control head for the BMS didn't need much work other than a good cleaning and the conformal coating to protect it.
Original material ©1996-2026 Mr. Sharkey | All rights reserved