
EV Pusher Archive Page Two
EV Pusher Project
Archive page two
January 31, 2001. A new page for a new month (February). I'm working on completing 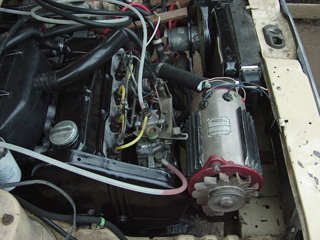 the installation of the AC generator before I start on the towing tongue and cut the car down the middle. It seems to be a lot easier to reach the engine compartment without having to lean over a bunch of hardware attached to the front of the car, and this generator is damned heavy, clumsy to handle, and is requiring a lot of effort to make fit into the engine compartment.
Today, I decided on a mounting bracket configuration, and began construction on it. I have a lot of welding and small fabrication to do, but it should be pretty much done within a day or two. I still need to move the radiator about ¾" towards the driver's side of the car. Doesn't sound like much, but I am out of room, and running into obstructions. I did think about taking the radiator to the shop and having it cut down an inch, but that would be, well, expen$ive!!!
Feb 3rd. Today was a complete wash-out as far as the weather goes, but yesterday, I purchased 15' of 2"x3/16" steel box tubing and a trailer coupler fitting so I can begin construction on the tongue. Also picked up some fasteners, and traded a full tank of argon gas that I purchased a couple of years ago to weld aluminum for a tank of 'Cougar', which is a 25-75% mixture of CO² and argon. Using this instead of straight CO² will improve the quality of my welds, and make welding thin steel much easier. While at the welding supply store, I also got a fresh tank of acetylene for the gas torch.
Evening yesterday, I converted my drill press (such a handy tool!) into a light-duty milling machine to make some needed modifications of an aluminum fan spacer that I will use to mount the second pulley on the crankshaft for the generator belt to run in.
Today I mostly just cleaned house and cleaned the Crown (see elsewhere on the site), which I have been using as a workshop for the last two months while working on the pusher. This evening I used the on-line ordering feature at Jameco Electronics to order a ball bearing servo motor to use to remotely control the engine throttle on the trailer. Now I won't have to use a piece of string tied to the injection pump like I was planning. To finish up the day, poked around on the 'net and learned more about servo motors and how to control them. It's soooo simple when you're exceptionally intelligent like I am!!
Feb 8th. The first meeting of electric and diesel. The much-anticipated snow storm didn't happen today, and in fact, it didn't even rain until late afternoon, so I got out and flushed the cooling system on the pusher so I could put in some anti-freeze and stop fooling around draining the radiator after each time I ran it. (Oh yes, the radiator is installed now, I spent yesterday constructing custom mounts and carving up 5 radiator hoses and reassembling the pieces to connect the radiator to the engine.)
Since it was required to run the engine up to operating temperature three times to flush, rinse and mix the antifreeze compound, I decided to use some of the available power to charge up the EV using the now fully installed AC generator on the engine. The results were mixed. The on-board charger on the Rabbit requires line frequency to be pretty close to 60 Hertz to operate. When I tried to set the speed of the diesel to give me that output from the generator, the engine would kind of "avalanche" past where I wanted it to run, revving too high for the charger to work. Not sure what that's about, might be normal, or I still might need an injection pump. I'm considering other options, such as converting the AC to DC so that the frequency is irrelevant. The batteries want DC anyway, so why stress the small stuff?
Before going in for the evening, I built a small electronic circuit to test the servo mechanism that I intend to use to actuate the throttle. It worked well enough for a test. In the next few days, I'll create a more sophisticated PWM circuit to try.
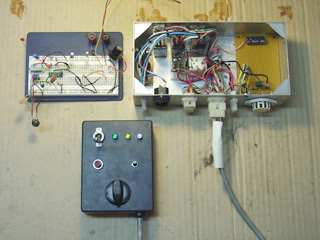
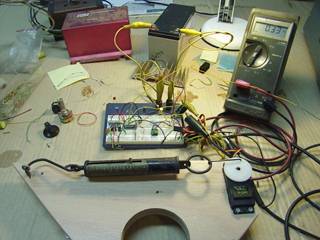 Feb 11th. Now I'm learning robotics. In order to make the throttle work, I'm designing circuits from scratch to have the attributes necessary to adapt the RC model servo mechanism to properly actuate the accelerator lever on the diesel injection pump. In this image, the custom circuit on the prototyping board at the middle is sending the servo (bottom right, with the round white wheel) a pulsed signal corresponding with a position of approximately 45° from the at-rest position. The servo is connected to a spring scale, which is indicating about 4 pounds of thrust, which is about what the diesel injection pump lever requires to move. The digital meter indicates a servo
  current of 0.33 amps, or about 2 watts at 6 volts, not a lot. I let the servo hold this thrust for about a half an hour to see it anything got hot, fried, or failed. Looks like this servo can easily pull 8 pounds, and as much as 10.
At right is the face of the oscilloscope, showing the pulse waveform, and the frequency counter, which indicates that the pulses are occurring every 16ms, or at 60 Hz. To change the position of the servo wheel, the circuit changes the ratio of on-to-off as shown on the 'scope screen. The original purpose of the integrated circuit I am using is as a switching power supply driver, but it makes a dandy pulse width modulator as well.
Not shown here is the work I did Friday and Saturday, cutting out the pieces and beginning to weld up the towing tongue that will be mounted in the front of the remainder of the car. More on that when the weather improves. Working outside with cold steel when it's 35° F and drizzling rain isn't my idea of a pleasant Sunday afternoon.
Feb 13th. As the Klingons say, "Today is a good day to weld", or at least better than yesterday. I thought that laying some beads down on the thick metal of the towing tongue would be a piece of cake, but when I tried to assemble the pieces, I had nothing but trouble. Adjusting the wire speed, current, gas flow, and technique yielded little improvement. All of the welds penetrated the base metal OK, but the appearance was totally unacceptable, they looked like an amateur had gotten a hold of a wire feed and went nuts. I ground down the ugly welds, and today used my reliable old stick welder to go over the joints to improve the appearance and fill in the shallow beads. Of course, stick welding leaves it's own imperfections, like spatter and slag, so now I have still more grinding and wire brushing to clean things up a bit.
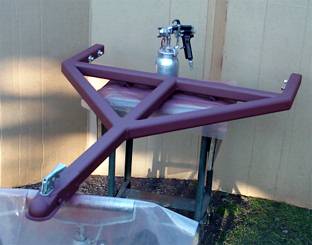 Valentine's Day. And what better way to say "I love you" than with a spray gun? In spite of being basically out-of-commission with some dreaded virus, I pressed on and finished the welding and grinding, then laid on a coat of red oxide primer-sealer. So now this part of the project is done, it just needs to be bolted in place.
I think I figured out why my welds with the wire feed were so bad a few days back. I'm pretty sure I must have gotten a contaminated tank of gas. When I switched back to pure CO², all of the problems disappeared. Wish I'd tried that before I was doing the last several welds.
Feb 15th. I am so sick, even my hair hurts. Didn't get very much done, as I felt like trash. In what few minutes I was able to work, I managed to disconnect the exhaust system, and pull out all of the fuel lines in preparation for the big cut. Just before crapping out in the afternoon, I did some small stuff to prepare the servo to be attached to the accelerator cable. Uhg. Off to bed....
Feb 18th. Uh oh, this project has been discovered by the EV community. Now the heat will be on to actually finish it and make it work.
 Tomorrow, I'll begin the quest to gather parts for some kind of device to actuate the clutch. I only need to move the lever on the transmission 1½", but the maximum thrust is 80 pounds, so It's got to be something strong. I'm inclined to use the windshield wiper motor and gearbox for power, perhaps with a lead screw to take up the lever. I'll look for garage door openers at the salvage building materials yard, they should prove to have some interesting mechanical parts inside, limit switches, lead screws, gear, chain, and belt speed reduction stuff, etc. Maybe I can get the whole pusher to work off of a 'clicker', so I don't have to run wires!!
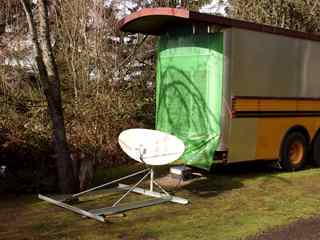 Hey! What kind of a Pusher update is this??? Feb 22nd. Part of the reason for little progress on the trailer is that most every spare minute I've had for the last four days was spent either trying to get caught up with work for clients, or completing the installation of this Tachyon.net satellite earth station which gives me wireless 2Mb/sec download speed. Here, the L-band antenna is set up on a temporary stand behind the Crown as a test to see if my site can receive the satellite signal, prior to mounting the hardware permanently. Now I can download files from the net at amazingly fast speeds, and even listen to web radio without interruptions in the audio stream. I probably have the world's only Housetruck satellite uplink in existence!
Progress on the Pusher will resume soon. My trip to the salvage yard was delayed until Tuesday, due to Abe and George's birthdays. Once there, I looked over about 10 cast-off garage door openers, looking for useable parts. The openers were of two types, chain drive, and lead screw drives. The chain drive units might have yielded some useable hardware, but they were pretty rudimentary, with large v-belt pulleys, or proprietary worm-drive transmissions coupled to hefty synchronous AC motors. The screw type were all direct-drive, with specialized sealed motors. None of them looked like something I could hack into something more useful.
I decided that I could probably do better with something else, and on the way out, happened to notice an old scissors-type auto jack laying on a shelf. It had a lead screw with matching nut, a thrust bearing, and only cost $2. In the next day or two, I'll see what kind of mischief I can get into with a grinder and saw to make this work as a clutch driver.
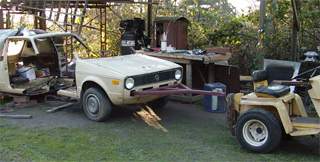
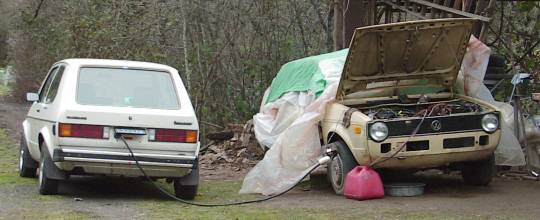
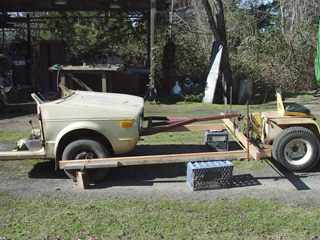
You know the old saying, "Half a Rabbit is better than one".... Feb 25th. I didn't really set out this morning to do the cutting thing, but about 4:30PM, it was obvious that the time had come. Spent some of the morning installing the limit switches on the clutch throwout mechanism, then installed the towing tongue after lunch. Some disappointment there, I thought that I had accounted for the angle of the car and tongue, but apparently not, as the tongue is about 3½" too high in the front. This is visible in the image above. Once again, there is no substitute for working on a level concrete surface. One day I'll have a nice drive-in shop so I can be warm too! Anyway, this problem can be fixed, I just have to block up the trailer (I can call it that now), remove the tongue, radiator, alternator, and AC generator to give me some elbow room, then make the mounting holes in the frame elliptical using a rotary file and drill motor. As I say, disappointing, because if I had been able to measure this before building the tongue, I could have simply offset the mounting holes in the tongue when I drilled them. Ach, live and learn.
For the record, and in case anybody cares, it took 20 minutes to cut the car in two, including some time fiddling with the saw after the blade came off. I knew it couldn't be too hard, after all, I cut a 40' bus in two the long way! That was difficult!
For now, the rear of the trailer is longer than it will be when finished. I wanted to have some fudge factor when I begin gluing the back end of the car onto the shortened front.
Feb 26th. I guess that the big news of the day is that the hard disk in my computer crashed after breakfast. I've spent a couple of hours recovering data not contained on the latest backup CD-ROM, but it looks like I'm going to have some important stuff that won't be recoverable. I'm updating here using my old 486/33 laptop with a monochrome display, hand editing the page in Notepad+, so don't look for any fancy stuff until I get a new drive and have all of my programs loaded and ready to go.
|
I did work on the trailer today, pulling it out into the driveway and doing some alignment, using some 2 x 4's, a straight edge and tape measure, before locking the steering rack into a straight-ahead position. Also removed the heater assembly, pedals, steering column and some superfluous brackets from the under-dash area. |
 |
March3rd. It's been an intensive week. Aside from purchasing and installing a new 30 Gb hard drive, and then reloading all of my programs, retrieving files and restoring from back up CD-ROM disks, I also managed to work on the pusher some as well. Now that I have Front Page 2000, Phototshop 5.5, and the drivers for the memory card reader of my digital camera installed and working, I can go back and add some images to the week's work.
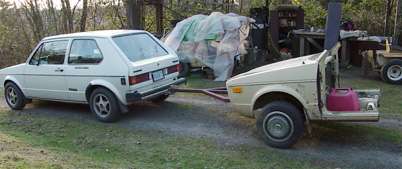
This was the scene on Wednesday the 28th. After spending the previous afternoon installing the original muffler in the space provided by the 'hump' between the seats and running the short exhaust pipe out the center of the floor pan, I was able to start the engine for the first time in a while. This explains the fuel container on the floor section. The project in the afternoon was to install the salvaged towing hitch to the rear of the EV, which was a fairly simple no-brainer, drill some homes and insert the 7/16" bolts, tighten to almost breaking. Now the problem with the towing tongue is fairly obvious, the tail of the pusher is way in the air compared to the EV's angle. The remnants of the back of the car look like some ramshackle bum's shelter, covered with tarps and plastic. Can't wait to saw it into manageable pieces, cull out the useable parts, and haul it off to be recycled!
Today was a fairly low-level Saturday. Went out to check out a new job installing wiring at a tropical fish store, ate lunch, took a nap (yawn), and worked a little more on 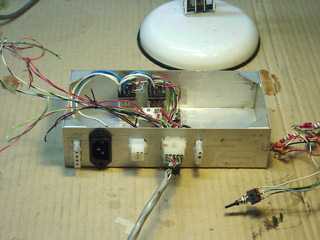 the controller for the trailer, at least the prototype that I'll use to test it with. As I build the electrics, I expand the project with ideas and enhancements, and have to keep in mind that the complexity of the controller changes when there is an automatic transmission in the final (?) product. For now, the controller will supply ignition (injection pump fuel solenoid), monitor alternator and oil pressure idiot lights, and control the clutch in/out. Future enhancements will include starter, fuel gauge, water temperature gauge, glow plug control and maybe radiator fan manual switch. Important safety features including throttle defeat, deadman interlock, breakaway kill, and more will be needed in the final controller.
No promises, but I hope to have everything ready for a road test by next weekend. I have the controller to finish, installing the PWM circuit for the throttle servo, stop, tail and turn lights to install, and a head unit that installs in the EV, so I can control the throttle and clutch from the driver's seat. Sunday morning should be a nice, quiet time to have some space to myself on the highway, so that's what I'm shooting for. We'll see what the next week will bring. First the flu, then a hard drive crash, what's next, an earthquake?
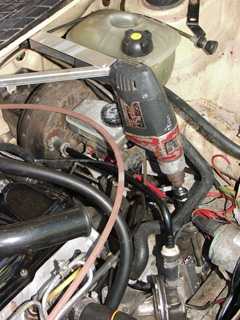
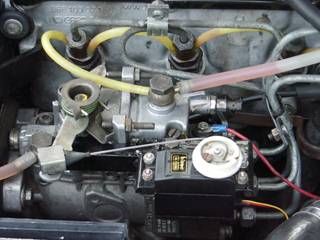
March 7th. Question: "Say, isn't that a Skil© Xtra-tool hammer-chisel-drill in your engine compartment?" Answer: "Oh you recognized it..."
Once I had the lead screw and bearing installed on the clutch arm, the 13/16" hex nut on the end was a convenient way of running the screw in and out. I finally decided that a drill motor would be the easiest power source to adapt to working it on the finished trailer. Since I had this drill motor under the workbench, awaiting a new variable speed trigger (waiting for the last 12 years, it seems), I decided to just use it in the car, mounting it on an aluminum bracket, and coupling it to the lead screw via a spare spark plug socket from the tool box. Using this motor means that I will need 110 volts AC on the trailer to operate the clutch. Since I have a few spare DC-to-AC inverters laying around, this isn't going to prove to be much of a problem.
It was one of those two-steps-forward-one-step-back, two-steps-forward-three-steps-back type of days. Trying to run the drill motor from the controller didn't work, and I ended up having to replace two defective relays in the controller. These things happen when you build projects out of junk box parts. Then, as I was demonstrating the drill motor clutch actuator to a visitor, the clutch arm traveled a bit past where it should have stopped, and broke the lever arm off of one of the limit switches that senses where the clutch arm position is. This resulted in a complete redesigning of the limit switch assembly, a project for construction tomorrow...
Almost another week of work on the trailer, but a week of no updates.
March 12th. No I didn't get the pusher out on the road last weekend. After repairing the clutch limit switches, I needed to insert some speed control in the release motion of the drill motor, so I shredded a lamp dimmer and inserted it into the controller. After that, I tried the system on a 300 watt inverter that I had lying about. Worked fine on the "disengage" cycle (full drill motor power), but the inverter didn't sense a load through the dimmer module for the "engage" cycle, so I had to insert a time-delay relay into the circuit to give the motor full power for about ½ second when the "engage" command is given. After the time-delay relay releases, the motor goes to lower speed. so as to not over-travel at the end of the clutch arm's limit. Whew, one less problem, or one more problem I wouldn't have if I had an automatic transmission.
 Yesterday, I began construction on the control head that will mount in the EV so I can ride herd on the controller's actions back in the trailer. Worked out a few bugs, such as the ignition being back-fed through the alternator warning lamp, resulting in no way to shut down the engine once it was started.
The three colored lamps are: green: glow plug activity, yellow: alternator warning lamp, red: oil pressure warning lamp. The red lamp will also have a second function, which is to flash when the throttle servo circuit is in "fault mode", which occurs when the EV's brake lights come on, or the trailer's clutch is disengaged without the servo being returned to "idle" beforehand. Just a little safety interlock to prevent accidents and engine overspeed.
The controller itself is gaining in complexity with the additional circuitry required to support the requirements and features I'm building into the system.

Just a quick little update, Mar 14th. An inside view of the controller head, with the PWM circuit installed. Only about an afternoon's worth of stuff stands between me and a road test now. I need to make an extension cable for the controller head, so I can operate it from inside the EV, there's still a short cable from the controller to the servo to be made, and I have to get some tail/stop/turn lights on the trailer so it will be highway legal.
March 22nd. Everything is ready for the test drive. I completed the control head and extension cable, installed trailer lights, hooked up the inverter, and even used some leftover aluminum from the ceiling of the bus to make a teardrop enclosure to conceal the battery and fuel container. This cover will be replaced by parts of the original sheet metal from the donor car, but for now, it was quick and easy to smack this in place using a couple of sheet metal screws.
I did tow the pusher out on the road today as a test. No power, the engine was off and in neutral, but I wanted to see what the general response of the front clip was to being hauled around. Got it up to 40 MPH on some smooth pavement, and basically couldn't tell it was back there once I was at speed. Of course, the car was a little less peppy (well, I guess it would have to be "peppy" in the first place to be less so) and I used about 20% more power from the batteries than I would have without the trailer along for the ride. No matter on that, the point is to use the diesel for power, it's not like I'm going to tow it all around town each and every time I go out on an errand. That's the point of building it into a trailer, it can be disconnected and left at home when not needed.
The fuel container is topped up with diesel salvaged from the tank in the car, all of the electrical connections are done, and now I just have to hope for a sunny weekend morning so I can get out on the road and try it out. More about that when the saga continues.
Original material ©1996-2025 Mr. Sharkey | All rights reserved