
Pusher Archives
EV Pusher
Archive Page One
How this Project Began:
|
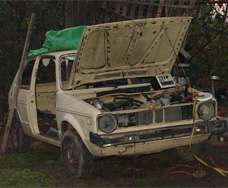
Tuesday, December 5th. 2000. Today, while out cruising wrecking yards, I found a donor car for the project, a 1978 VW Rabbit diesel. This car was complete mechanically, but had been heavily vandalized. The junk yard guys probably thought I was nuts for wanting it, but I bought it, rented a flatbed trailer and hauled it home. Here it is before I did very much to it. Pretty sad, isn't it? |
 |
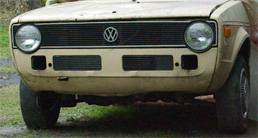
 December 7th. HOURS of fun today, attempting to get the diesel engine running, with no success. Most of what I have read on the Internet says that the injection pump must be bled clean of air for the car to run, so I set up an electric fuel pump, gas can (half filled with high-sulfur diesel), and no less than three batteries and chargers. Still no go... Maybe problems with the injectors?? If the injection pump is bad, I wasted both my time and money, as a new one is $400. While I was waiting for the pump to prime, and between starting attempts while the batteries recharged, I fitted a replacement grille, headlights, wheel covers, and side markers "donated" by the junk yard. Also removed most of the ratted out electrical wiring, nasty wet and glass-embedded carpet, and stripped out parts that will not be needed when the pusher is finished.
Now everything around me smells like diesel fuel, my hands, my clothes, my hair, my shoes, all my tools, Yuuuch. Think how much worse it will smell once it is running!!!
December 8th. Another half-day trying to get the engine running. I removed all of the injector plumbing and removed the injectors from the head, cleaning the carbon deposits off of the tips, removing the heat shields at the bottom of the injector wells and cleaning them, and then finally cleaning the holes, threads and anything else that looked cruddy. Cleanliness wasn't really the issue, I needed to tighten the #3 injector, as it was showing bubbles at the base when the engine cranked. In order to get at the injector, a lot of stuff had to come off, so I thought I'd just remove them all. Fortunately, my 1 1/16" box end wrench is a perfect fit for the 25mm hex on the injector body (I have GOT to get some metric tools). While the injectors were out, I fired up the glow plugs, which were visible through the injector holes in the head. All four got red hot after a few seconds.
Reassembled the injection system, bled the injector lines and tried starting again. Same results as before. The engine does crank faster now, as a result of fixing a flaky battery cable connection at the starter.
At this point, I'm considering my options. I'll probably check to see that the timing belt hasn't jumped a cog at the cam or injector pump, maybe pull an injector and the crank the engine while the injector is in free air to see if it looks like the injector pump is working. This leaves few other options. At this point, I'm thinking that the problem is a bad head gasket or bad valves. There is a obscene farting noise coming out of the intake manifold intermittently after cranking, possibly pressure escaping from an adjacent cylinder that is on a compression stroke?
One thing is for sure, if the experience of yesterday was oily and smelly, today was an ultimate dirt encounter. Every pore in my hands is stained black and no amount of scrubbing seems to make it go away.
 December 10th. Another few hours of work, but at least now I know why it doesn't run. Diesel engines are supposed to have at least 400 psi of compression. Checking mine, I find that the #2 cylinder is at 45 psi, and #3 is at 230. Hmm, looks like it's time for a head gasket. Tomorrow, I'll begin gathering tools for the job, a 6mm hex wrench, some metric sockets and end wrenches, and I'll try to find a special allen-type wrench that is needed for the head studs, that has 12 points instead of the normal 6. Once the head is off, I can decide if I really want to invest the time and money into fixing it, as I will be able to see if the valves are in any shape for continued use, and more importantly, if the head is warped, a common cause of blown head gaskets.
During a pause in the rains yesterday, I managed to use my oxy-acetylene torch to heat the last bolt holding the front bumper on, which allowed me to remove it and the bumper. Now I can begin making plans for the trailer-type tongue and coupler that will have to be built to make this set-up functional.
December 15th. During a break in the weather, I managed to pull the cylinder head off the engine. By the time I got it loose, darkness was setting in, so about all I know at this point is that the #2 cylinder looks like it has barnacles growing in it. The head gasket looked fairly normal, although the torque tightness on the head bolts was all over the map.
This is the first time I've worked on a German engine, and I have to say that I'm mightily impressed. None of the fasteners stripped or broke off in my hand, and even the usually rusted-in-place exhaust manifold bolts came loose with no problem. My previous experiences with Japanese ISO metric fasteners has always been frustrating, to say the least.
I did wise up a little bit and remembered to wear latex gloves while working in the oil and grease. Wish I'd had the presence of mind to do that from the first. It makes the job of cleaning up a whole lot more effective.
Next break in the weather will allow me to check out the valves and see if I have a problem there. These VW engines use a tappet-shim system, and it sounds like adjusting valve clearance is a major pain in the muffler. We'll see.
 Dec 16th. I swear I'll try not to show images of greasy engine parts here. Took advantage of a continued dry and unseasonably warm morning to more fully inspect and disassemble the cylinder head. The #2 cylinder valve seats look to be completely covered in carbon. The head gasket did look like there had been some leakage to one of the cooling water journals, which might also explain the coating of rust on the walls of the cylinder. Tomorrow at the flea market, I'll look for materials to make a valve compressor tool so I can pull the valves and see what is really going on there. Also noticed quite a lot of fuel leaking out of the front of the injection pump now that the tension is off of the pulley. This motor has some problems for sure.
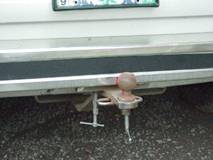
So, no greasy engine parts, but a photo of the spanky used trailer hitch that I'll mount on the back of the Rabbit EV for connecting the pusher, also donated by the wrecking yard. Here it's held on by C-clamps for a test fit.
The fun continues, Dec 17th. After grinding the side out of a 1" socket wrench, I used it and the drill press to remove the retainers on the #2 cylinder valves. The valve seat and faces were crudded up with carbon, but there was no evidence of burning or warpage.
Back at the car, I began to wonder why the carbon and corrosion on the back of the cylinder wall had no marks indicating that the piston rings were scraping on the thick deposit. I decided that the rings must be broken. Oh Boy, more problems. Formulated a plan involving obtaining used pistons at the wrecking yard and installing them to replace the existing ones in case things were as bad as they seemed.
Dec. 18th. By the end of today, I was about as far into an engine as one can get without taking it completely out of the car. Removed the oil pan and loosened up the #2 rod bearing cap. Pushed the piston out the top of the engine, working from below. When I had it out, I saw what the problem with the rings was. Carbon and rust from the leaking head gasket had caused the first and second piston rings to become stuck in their grooves, effectively eliminating any contact with the cylinder wall, and causing the compression to drop to nearly nothing as well. A little poke with a small jewelers screwdriver freed both rings. This piston will need a major clean-up, but I don't think there is anything much more than this and cleaning the valves needed to restore at least the better part of full compression. For good measure, and because it was only another 6 cap nuts, I removed all of the pistons, labeling them, and placing them in a box to be cleaned as well.
Special thanks to Jack at VW Diesel Parts in West Union, Ohio for his prompt reply to my query this afternoon about some small cosmetic cracks in the aluminum casting of the cylinder head. I'm getting a real online education about VW diesel engines from a variety of sources. There may be a future 'Links' page to list some of the better sources of information.
Sunday, December 24th. More stuff. Last week I found a '83 Rabbit with an automatic transmission and gasoline engine sitting in a defunct used car lot 20 miles south of here. Put in some calls to find out how much they want for it, but got no replies. If the diesel is dead, I'd be willing to try a gas power plant, and the automatic transmission is essential for whatever the finished product ends up being.
Also last week, stopped by another wrecking yard and found a couple of complete diesel Jettas on the lot, and a wrecked Rabbit Cabrolet (convertible), which might make an interesting back end for the pusher. Maybe more on that later. One car in the wrecking yard had a good hood which was lined with heavy sound insulation, which I'll need when I get the diesel running. The hood on this car has several large holes from the vandalism.
Today, I got some solvent, made a degreaser solution, and washed down the entire cylinder head, so now I may be able to begin showing images of not-greasy engine parts. Upon inspection, I found that the #3 exhaust valve is very worn. Since I don't want to put much money into this engine until I know that this whole project is worth doing, I guess I'll hope for the best and reassemble the engine. If it looks like a pusher is a useful tool, I can always do a rebuild later. This engine will need a rebore, new pistons, and by the looks of it a remanufactured cylinder head. Let's see, all of that should come to about $600.....
A portion of my spare time has gone into researching Biodiesel fuel for the pusher to run on. If you want to know more, click this: www.journeytoforever.org/biodiesel.html>.
Season's Degreasing's. December 25th. Helluva way to spend Christmas day, but the weather was stellar, and I wanted to be outside as much as possible. Spent pretty much the entire day removing grease from the valve springs, keepers, and associated hardware. In the afternoon, I disassembled the #2 piston, removing the rings and spent a considerable amount of time cleaning out the kerfs in the piston, removing carbon, rust and other crud packed into the space, and removed rust and corrosion from the rings themselves.
I have to keep reminding myself that this engine was running at one time, and that all of the little things that one usually takes care of when doing an actual engine rebuild just aren't going to happen now, maybe later. I am still rather concerned about the valves and seats, as they are in not-great condition, and diesel engines rely on high compression to work properly.
Aside from all of my time in disassembling, cleaning and reassembling this engine, I'll really only have $20 into a new head gasket, plus four quarts of oil, and whatever a new oil filter costs. If it runs at all, I will consider myself lucky. If it has enough power to actually push the EV down the road at highway speed, I may just decide it was all worth it. On the other hand...
Jan 3, 2001. On and on and on and..... As much as I'd like to say that I spent the last week getting the diesel running, that's not quite the case. I did clean a lot of engine parts, then took the holiday weekend off, visiting at the beach house for four days and three nights. Hey, I gotta recreate sometime! Today I resumed cleaning, and when I removed the drive gear from the camshaft, I found that the last mechanic to work on this part of the car had left the half-moon Woodruff key out, and the camshaft was about one tooth out of time with the drive gear. This might have been compensated with a converse misalignment of the drive belt, but since I am attempting to eliminate as many variables as possible, I spent way too much time grinding and filing a piece of 3/16" square stock to fit the 4mm key socket.
Now we are supposed to have a spate of rainy weather, so I don't know how much more I'm going to get done until the plain-old cold and fog returns. What I do know is that I can continue collecting the supplies needed to reassemble the engine, so I'll concentrate on that until it's wrenching weather again.
Lack of updates to this page means, well, lack of updates. I've been thumping along on the pusher project a little almost every day, but as you'll see later, it's a four steps forward, 3½ steps back type of progress.  As I told you in a previous paragraph, I've been very satisfied with the quality of the construction of the engine in this car, but I did manage to strip out the internal splines in a 8mm cap bolt that holds the v-belt pulley to the front of the crankshaft. On Jan 4th, I pulled out all of the stops to weld a 3/8" SAE bolt to the head of the offending fastener, and was able to wrench it out without further tinkering.
Refurbishing the head continued with a relap of all of the valves, using coarse, then fine grit abrasive compound. When this was done to my satisfaction, I gave the head and valves another bath in degreaser to make sure that all of the gritty valve lapping compound was removed, then used my 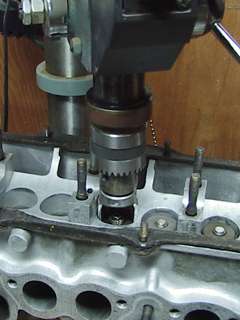 custom valve spring tool and the drill press to re-fit all of the valve train hardware back into the head. I got interrupted by social obligations this night and so had to complete the process the next, finishing up on Jan 1st.
Now the real fun began. Remembering how I thought so highly of the fasteners and quality if the engine's assembly, Consider the following an exception (and a warning!).
The next step in the assembly process would be to fit the overhead camshaft to the top of the head, which I did, and after applying an adequate amount of lubricating oil, I began to fit the camshaft bearing caps and the nuts that tighten them to the head. Unfortunately, one of the studs that you see in the photo had been over-torqued at some point, and the threads in the aluminum head were stripped. The 8mm stud simply pulled out of the head as I tried to tighten it, even very loosly.
Jan 13th, a trip to the fastener store to get some repair parts, an 8mm by ½-13 threaded repair collet and a ½-13 bottom tap. Twenty or so minutes of drill press and hand tapping work later, I was back to installing the camshaft.
This time, I got as far as applying 10 foot-pounds of torque to the nuts before three more studs pulled their threads out of the head !!!
Jan 15th, back to the fastener store for more collets. I bought one more than I needed, just to have a spare.  Good thing too, because on the third try installing the cam, another stud pulled out. That's five out of ten, or 50%, NOT good. Used the spare collet (after drilling and threading, of course), and finally managed to get the camshaft installed, and the bearing caps torqued down tight!
Jan 18th. I get the idea that this car was exactly where it belonged when I found it, IN THE JUNK YARD! With all of the running around gathering repair parts, I also bought a new oil filter (Bosch), a valve cover gasket set, head gasket, exhaust header gasket, timing belt, and some Delo 400 motor oil. With all of this on hand, today, I decided to try to install the cylinder head on the engine.
After setting the head on the new head gasket on top of the engine, I got this funny feeling that I should put the intake and exahust manifolds on before I torque down the head. There are 14 of the troublesome 8mm threaded holes in this part of the engine, and I'll be damned if I want to ruin a $20.00 head gasket by finding out that they are going to strip out 1 out of 2.
Good thing I thought about it, because just one of the intake manifold bolts pulled it's threads out of the head when I tried to torque it to 18 ft.lbs. Damn! This is getting old! Tomorrow, I'll have to drive over to the fastener place and get more collets. At least I didn't trash the head gasket by having to tear it all apart to drill and tap the stripped hole.
What else can go wrong? Plenty!, There doesn't seem to be any clearance between the cam and the valve 'lifters'. I'll probably have to take the cam out to fix this at a later date, but I want to see if I can get it running and warm the whole engine up to operating temperature before I get into that can of worms.
January 20th. HOLY COW!!! IT RUNS!!!! Spent much of Friday assembling the engine, putting the head on, installing the new timing belt, all of the stuff needed to put it back together. I managed to not strip the threads out of any more fasteners, but did find out that it's necessary to put the timing belt idler pulley on the head before installing it on the engine. Of course, I only learned this after I torqued down the head bolts. Fortunately, I was able to remove the stud the pulley mounts on, and get it properly in place that way. Late in the day, I decided that there was still enough to do, so I'd wait until Saturday to try and start it up.
Saturday morning, I finished the small bit that had yet to be done, bled the injectors, and tightened down the fuel lines. For good measure, I filled the radiator and engine block with the hottest water I could carry in a plastic bucket, then turned on the 400 watt block heater to warm it even more. My initial attempts to start the engine resulted in a partially dead battery and a bruised ego, so I busied myself with some other chores until the battery charger got done doing it's thing. I've been told that these engines need to crank fairly fast and strongly, so I wanted a full battery to pull it off.
The next few attempts resulted on only a bit of sputtering and the "bendix" unit in the starter kicking out. I had already decided that I had probably wasted six weeks of time trying to resurrect this motor, and had pretty much resigned myself to finding another donor car and starting over, so I wasn't too attached to today's outcome. A few more starting attempts, fiddling with the "cold starting knob", and throttle didn't produce any better results. Finally, I decided to really fry the glow plugs, letting them get hot for about 50 seconds. A sputter, then the engine sprang to life! The oil pressure came up, and it began to get warmer, so I unplugged the block heater. I wanted to run the engine up to operating temperature, but now that it was operable, I found that the water pump was defective, and was making a lot of racket (so much that it was hard to hear the distinctive 'diesel' sound of the engine), and a spray of rusty water was flying off of the water pump pulley. Considering these conditions, I opted to run it only until the thermostat opened, then shut it off. I made numerous later starting attempts, and it obediently started right up each time.
Jan 21st. A pretty rainy day today, only managed to get the water pump off and disassembled. Tomorrow, it's off to the parts store again.
Jan 26th. Five days of part-time work on the pusher. Replaced the water pump, cleaned up the bolts and hardware, welded up a stress crack in the alternator mounting bracket, and gave the steel parts a coat of black paint. Also purchased some rubber mounts for the radiator, and a new V-belt. Yesterday I spent some time installing a rudimentary electrical system, power to the injection pump, an oil pressure light, alternator lamp (necessary to make the alternator put out current), and wired up the radiator fan and thermostatically actuated switch. When I finally got it all put back together and tried it out this morning, it started right up! Let it run for about a half-hour, until it was up to operating temperature, then removed the valve cover and used my new metric feeler gauge to check the valve clearances.
This was something I was concerned about, as two of the intake valves had zero clearance when the engine was cold. Checking them hot didn't improve the situation. All of the valve clearances were too tight, so I calculated the proper thickness of shims, then pulled the camshaft to remove the #2 exhaust valve cam follower, which had a shim that couldn't be removed previously. I ended up having to weld a bolt to the shim so that I could pull it out of the follower bucket with a pair of vice-grips.
Replacement shims were a buck each at the parts store, so I purchased a full set of the proper thickness. Tomorrow I'll find out if any more cam cap studs are going to pull the threads out of the aluminum cylinder head when I reassemble the top of the engine. If all goes well, I could be done with the engine tomorrow, and move on to the next phase, cutting, chopping and trailer-making!
January 27, 2001. I'd be popping champagne corks, if I had any champagne, that is. Today marks the end of mechanical work on this engine. Morning, I installed the valve adjusting shims, and replaced the camshaft. Of course, one more of the 8mm cam cap studs decided to let go, so I had to tear it all apart again and drill and tap for a thread repair collet, this time, working in the engine compartment with hand power drill instead of the drill press. Guess my aim was pretty good, as it all went back together and the ten studs torqued down properly with no more problems. Started the engine (it seems so easy now!), and let it run up to temperature, then pulled the valve cover to check the valves again. I did find one exhaust valve that had excessive clearance, so I pulled a shim out of my growing spare-parts collection and replaced it, bringing the clearance into specs.
So, the next entries should be the beginning of what I hope is a fairly short chapter of building a towing tongue, sawing the car in two, and an exciting story about the first trial run on the freeway! Stay tuned for more!
Jan 28th. A short day of mostly maintenance-type stuff. Vacuumed a shoe box full of broken glass out of the interior, cleaned up and organized the several boxes of salvaged parts and removed some additional junk that won't be used in the final product. Most significantly, I cut out the rear brake lines and plugged the ports on the master cylinder to prevent the fluid from leaking out. I have plans to keep the braking system functional, with the intent of being able to apply them from the EV when needed. Haven't completely figured out how I'll actuate the brake system, but that's a problem for later.
Also used my multi-meter to take a resistance reading of the fuel gauge sending unit to determine how much diesel fuel was in the tank. Turned out to be only a couple of gallons, so I used the electric fuel pump to drain the tank into a fuel container, getting the tank and fuel lines ready to be removed for the upcoming Sawzall-action.
In the afternoon, I dug the 3,000 watt AC generator out of storage and tried to find a place under the hood where it would fit. Nowhere was the answer to that inquiry. It looks like I'll have to move the radiator about 3" to the left to clear enough room for the generator, which is almost as large as the diesel engine itself. As this is an important part of the finished pusher, I'll need to make room for it. The generator will allow me to charge the EV batteries when the car and trailer are stationary, as well as being a substantial portable power source for running tools and other appliances.
Original material ©1996-2026 Mr. Sharkey | All rights reserved