Early Crown Photos 5
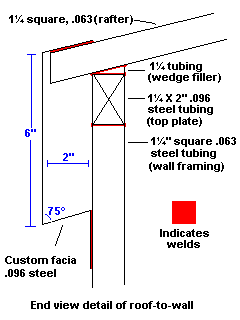
Over the winter, I made some designs and drawings, and came up with an eve design that could be used to join the roof and walls. I knew right from the start that I wanted the roof and walls to have a crisp intersection, an actual eve that would prevent water from the roof from simply running down the sides of the bus, and one that would allow me to have rain gutters when the bus is parked stationary.

The profile of the facia/eve is straight from the Grace bus, although the material and dimensions were worked out to suit my construction. In the end, I had eight ten-foot sections of 16 gauge cold rolled steel formed at a specialty sheet metal shop, four for each side of the bus. These allowed a 2" lap at the roof, so that the roof aluminum had a structural surface to rivet to, and 2" vertical at the top of the walls for the same reason. The facia is welded into place on the rafters and pillars, and adds structural rigidity to the framing, as well as creating the design I wanted. I completely enclosed the top plate steel, and as an added bonus created a 5x2" chase the entire length of both sides of the bus, a feature that I was able to put to good use later when I started installing electrical wiring.

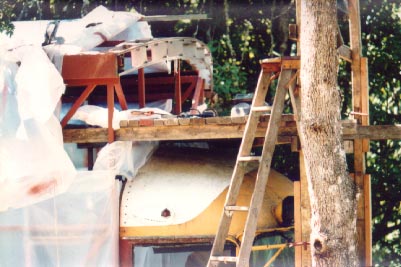
This photo also shows the steel tubing that was welded in between the rafters at the center and to each side to provide stiffness, and to give even more surface to rivet the roof sheathing to.

With the facia installed along the sides, I spent the spring constructing the compound curves at each end of the bus roof. These were built up using custom jigs and templates from flat and straight sheet metal and square tubing. When I began the first end, I had no idea what I was doing, I just started sculpting the metal, imagining the end result, and adding pieces as I went. Whatever I did, I knew that it had to be repeatable at the opposite end, and reuse as many templates and materials as possible.
The 2x4 scaffolding here was a custom job to allow me to get close to the work without teetering on a ladder.
I remember well one incident while this front work was being done. I had taken down the plastic sheeting on the front wall to do some welding, and after one session with the MIG welder, I raised my welding hood to find that the plastic sheet I was sitting on was afire between my crossed legs. My first reaction was the same as I would have if it had been a sheet of newspaper on fire, I slapped it out with my right hand. BIG MISTAKE!!! Unlike newspaper, there was a big puddle of molten plastic under the flames, plastic that immediately adhered to my bare skin and began burning the crap out of my hand, in spite of the flames being extinguished by the impact. I grabbed the plastic and pulled hard, and was horrified to see my flesh peel off with the now partially solidified puddle of plastic. This was a nasty 3rd degree burn that took many weeks to properly heal.
The worst part of all of this was that on my other hand I was still wearing a thick leather welding glove with a cuff that went up my arm well past my wrist. If I had used my left instead of my right hand, I would have suffered no injury.
Moral of the story: Make sure that in an emergency, even a small one, that you have a response instead of a reaction.
Original material ©1996-2025 Mr. Sharkey | All rights reserved
